Trial packages
Prepare the trial packages
Once your technologies have been randomized in ClimMob, the next step is to create the physical packages with technologies that participants will use for the blind testing.
How-to (three steps):
- Gather materials
- Collect enough of each technology option that you are testing.
- Example: If you are testing seed varieties, gather sufficient quantities of each seed type.
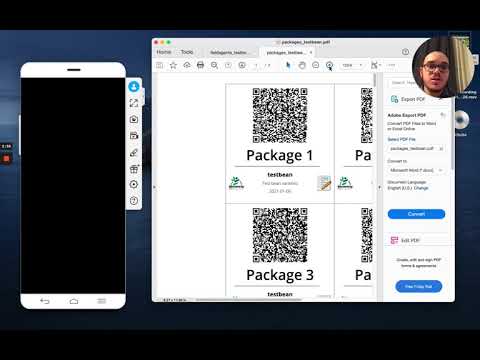
- Download package lists from ClimMob (in the Downloads section):
- Randomized trial packages list → shows which combination of three technology options goes into each package.
- Package list with QR codes for participant registration → contains the package number and its unique QR code.
- Prepare and label the packages
- Assemble each package with its assigned set of three technology options.
- Cut out the corresponding label (from the package list with QR codes).
- Stick the label with the package number and QR code on the package before distributing it to participants.
Every trial package should contain the following four elements:
-
A QR code generated for each package that will be used as a unique ID to track all the information collected during the trial. It is important to tell farmers to keep this code throughout the duration of the trial. Find out more about QR code generation here.
-
Three bags with equal quantities of the technology options (e.g. seeds, fertilizers) or instructions on how to apply the alternative technology options (e.g. tillage systems), according to the randomization that was generated by ClimMob.
-
An observation card where testers will note their on-farm observations. Find out more about observation cards here.
-
A brochure that explains the entire process to the farmer. Illustrations and other supporting material for communication with farmers can be found here.
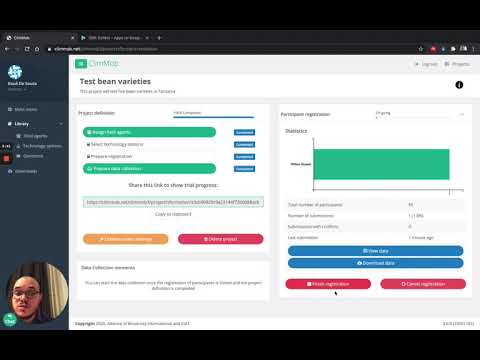
Assign and distribute packages
Once you have prepared the packages with the different technology options (see how to do that here), it is time to go to the field to distribute them and register each participant with their corresponding trial package.
How-to:
There are different ways to do this: you can arrange a meeting with all participants or visit them individually at their location.
Using ODK Collect
At a minimum, these basic data are required:
- Trial package QR code
- Name of the tester (participating farmer)
The trial package code uses an QR code generated by ClimMob as a unique package ID throughout the trial. The QR Code is generated once the technologies are defined and the randomization is set up. The project implementer prints the codes (available in the Downloads section) and pastes it into each package. Note: farmers should keep their package (QR) code for the duration of the project.
-
Open ODK Collect and get the blank registration form.
-
Fill in the form with participant data. The first step is to scan the QR code attached to the package with the three technology options the participant is receiving. This links the package to their individual profile.
-
Once the forms are completed, send them to the server.
Paper (NOT RECOMMENDED, as it takes significantly more time and is more prone to errors):
-
Alternatively, you can register participants using paper forms. These are available under Downloads → Printer-friendly registration form.
-
Enter the data into an Excel file. On the main menu (left side), click on Upload data (green button) → Create template. The template will be generated and available in Downloads → Excel template for uploading registration form data.
-
Once you have filled in the template, go back to the main menu, click on Upload data (green button, left side), and upload the Excel document.
Review, edit and complete registration:
- Click on the green button View data to review the submitted data and edit if necessary.
- Click on the red button, Finish registration once you have registered all participants.
⚠️ Please note: This step cannot be undone, so only proceed when you are certain that registration is complete.
Video tutorials:
To know more, you can watch the video below from minute 1.58 on:
Link ClimMob with ODK Collect, part 1
You can also watch this second video (from the beginning until minute 2:17):
Link ClimMob with ODK Collect, part 2